When building a membership website, you don’t have to go it alone. There’s a wealth of free web tools and online resources available to take advantage of to improve your design, optimise for SEO, deliver content, investigate usability issues & much more.
If you're a coach, trainer, adviser or expert offering membership options, stepping into the world of email marketing, choosing the right platform can feel overwhelming. The good news? You don’t need all the bells and whistles to get started — but you do need a tool that supports your growth.
Virtual meetings have become an integral part of modern communication, bridging the gap for businesses, organizations, and individuals worldwide. Whether a team meeting, webinar, or membership session, knowing how to run a virtual meeting effectively is a key skill. A virtual meeting is the ideal environment to encourage collaboration and boost productivity. Virtual meetings are a great way to promote your membership business too, for another way to encourage sign-up to your membership. Here’s a step-by-step guide to help you set up and manage virtual meetings with ease.
Step 1: Identify the Type of Meeting
The first step in running a successful virtual meeting is to determine what kind of meeting you’re creating. Different types of virtual meetings include:
Networking events
Meet-and-greet sessions
Job interviews
Classes or courses
Private or public events
Team meetings
Membership discussions
Webinars
Whether you’re part of a company, an organization, or an entrepreneurial venture—you undoubtedly host or attend virtual meetings regularly. This is especially true if your team operates remotely or globally.
Step 2: Define the Purpose of the Meeting
Every meeting should have a clear goal. Set this at the outset. If you a recruiter, your goal might be determining if your interviewee is a good fit for the job opening. If running a course or class, what should the key outcome or takeaway be for your audience?
Step 3: Choose the Right Tools and Equipment
Now that you know what kind of meeting you want to run and its purpose, it’s time to determine the equipment and tools you’ll need to actually set it up. Here’s what you’ll need for this step:
A computer with camera and microphone. Make sure all your participants also have access to the needed equipment. Attendees can participate in the meeting via desktop, laptop, tablet or smartphone, as long as they have access to the platform you’re using.
A virtual platform. Three of the most popular in use today are Zoom, Streamyard, and Slack.
Zoom:
Zoom has many features including the ability to set up a series of meetings, and live streaming to platforms like YouTube and Facebook. What Zoom is used most is for meetings, conferences, and classes across a wide range of industries. It offers many go-to features such as screen sharing and an easy to use chat area. Meetings can be recorded with one click, and hosts can implement break-out rooms so participants can meeting smaller groups. Here is how to set up a meeting in Zoom:
Streamyard:
Streamyard is a very popular alternative to Zoom, and is used most frequently for live streaming. You can embed registration forms on your website, and livestream your meeting or event to several different platforms at once. It also has most of the same features as Zoom including virtual backgrounds and recording of meetings. Here is how to set up a live stream in Streamyard:
Slack:
Primarily used for workplace communication, Slack is ideal for team meetings, private meetings, and the ability to share files and information. Once each team member is set up on Slack, they can send messages or chat in real time without having to set up a link in advance. Meetings are known as “huddles” in Slack, and support video, audio, and chat. Here is how to set up a Slack huddle:
Step 4: Send Invitations and Prepare an Agenda
Now that you’ve determined the type of meeting you want to set up, its purpose, and the equipment and platform you will be using, it’s time to send out invitations. Include the meeting link and an agenda in your invitation, explaining your goals for the meeting, structure and timeline. Let participants have a chance to review the agenda prior to the meeting, and offer feedback if desired.
Step 5: Break the Ice and Set the Tone
Once everyone is gathered, there won’t be much in the way of discussion among the participants prior to the start of the meeting, like you have with live meetings. They will be looking to you as webinar leader to get the meeting started. it’s a good idea to have a welcome message ready, and to thank everyone for being there. You might break the ice a bit more by asking everyone to introduce themselves, and/or answer a question. Where they are located, or what their goal for the meeting is as an attendee make good opening questions. Don’t forget to press the Record button if recording the meeting.
Step 6: Follow Best Practices During the Meeting
Once the meeting is underway, follow the agenda you previously set out. You may want to give people a chance to ask questions during or at the end of the meeting. Ensure everyone knows how to use the various features of the platform, such as raising their hand, and using emojis. You can mute everyone while the meeting is going on, which gives you control over the discussion.
Step 7: Gather Feedback
Participants might have feedback for you on the tone or structure of the meeting, which you can use to improve your meetings in the future.
Conclusion
Virtual meetings are the norm these days, even within brick and mortar organizations. With the convenience and accessibility of smartphones and computers, anyone can join a virtual meeting. Virtual meetings save time and money. You don’t have to rent a meeting room, or book time in a conference room. Most of all, they are the perfect environment for information sharing and recording the events of the meeting, as opposed to painstakingly taking minutes by hand.
Whether it’s a quick team huddle or a large-scale webinar, mastering the art of virtual meetings is a skill that will benefit any business or individual in today’s digital-first world.
Ready to start running virtual meetings? You can link to virtual meetings from your SubHub website. Open a free trial today.
If you want to see who’s linking to your website, there are several online tools that provide detailed data and insights on your backlink profile. These tools can help you track, analyze, and enhance your link-building efforts.
Here are some popular options:
1. Google Search Console
Overview: Google Search Console is a free tool that shows who’s linking to your site, your top-linked pages, and the most common anchor text. How to Use: Go to “Links” in the dashboard to view “Top linking sites” and “Top linked pages.” Pros: Free, with reliable data from Google. Great for an overview of high-quality and low-quality links. Cons: Limited in-depth analysis, such as link authority or anchor text distribution.
2. Ahrefs
Overview: Ahrefs is a powerful SEO tool offering in-depth backlink analysis, including link quality and domain authority. How to Use: Enter your URL in the Site Explorer, then go to “Backlinks” to see all linking domains, anchor texts, and linking pages. Pros: Extensive database with detailed metrics, link authority scores, and historical tracking. Cons: Paid plans start at around $99 per month.
3. SEMrush
Overview: SEMrush provides a range of SEO tools, including backlink analysis, which shows who’s linking to you and link quality. How to Use: The “Backlink Analytics” tool reveals referring domains, anchor texts, link types, and even competitor comparisons. Pros: Comprehensive insights, useful for competitor analysis and tracking progress. Cons: Plans start at $119 per month, which can be costly for smaller websites.
4. Moz Link Explorer
Overview: Moz Link Explorer offers data on linking domains, page authority, and domain authority. How to Use: Enter your URL in Link Explorer to see top linking sites, new links, and lost links. Pros: Provides quality metrics like Domain Authority (DA) and Page Authority (PA) and tracks link gains and losses over time. Cons: Free version has limited searches, with more features available in paid plans.
5. Majestic SEO
Overview: Majestic is known for its extensive backlink database and proprietary metrics like Trust Flow and Citation Flow. How to Use: Use the “Site Explorer” to get backlink data, anchor text analysis, and link distribution. Pros: Great for assessing link quality and relevance through Trust Flow. Cons: Paid plans start at $49 per month, with an older interface compared to newer tools.
6. Ubersuggest
Overview: Ubersuggest provides backlink data, competitor analysis, and basic SEO tracking for an affordable price. How to Use: Type in your URL and navigate to “Backlinks” to view linking sites, anchor text, and page scores. Pros: Affordable and user-friendly (free with limited features; paid plans start at $29 per month). Cons: Lacks advanced metrics found in tools like Ahrefs or SEMrush.
7. BuzzSumo
Overview: BuzzSumo excels at finding backlinks from content-sharing sites and offers insights into who’s sharing and linking to your content. How to Use: Enter your domain in the “Backlinks” section to see linking domains, content popularity, and link growth. Pros: Great for tracking content-based backlinks and social sharing insights. Cons: Limited to content-sharing sites, so it doesn’t provide a full backlink profile like other tools.
These tools can help you monitor and analyze your backlink profile, providing insights that support your link-building strategy. For a comprehensive approach, consider using a free tool like Google Search Console along with a paid option like Ahrefs or SEMrush for deeper analytics and competitive analysis.
Ready to start building authority for your niche with a membership website? Open a free SubHub platform trial today.
Browser extensions are small software applications that enhance your online experience by extending additional features and abilities right in your web browser.
By leveraging browser extensions, you gain additional tools to enhance the building and management of your membership website.
Browser extensions are easy to install and are often available through the browser's official store (e.g., Chrome Web Store for Google Chrome, Firefox Add-ons for Mozilla Firefox). Once installed, they typically appear as icons next to the address bar or within the browser's toolbar.
Whether you're recording videos, handling member support, or creating content, these six extensions will save you time, keep your workflow smooth, and ultimately help you deliver a better experience to your members.
1. Get organised with Todoist
The Todoist Chrome extension brings task management directly to your browser, allowing you to capture, organize, and prioritize tasks without ever leaving your current webpage. Whether you're managing projects for your membership site or just keeping track of your daily to-dos, Todoist helps streamline your workflow. You can create tasks from any website, add due dates, assign priorities, and even collaborate with team members.
Key Features:
Add tasks and reminders from any webpage
Organize tasks with labels, projects, and due dates
Collaborate and share tasks with team members
Use Case: Use the Todoist extension to track and manage tasks related to your membership site development, such as creating content, handling member requests, or scheduling updates, all from your browser.
Your membership site will likely be content-heavy, and the quality of your writing directly affects your credibility and user experience. Grammarly ensures that your content is clear, concise, and professional.
This extension helps catch grammatical errors, typos and awkward phrasing in real-time as you type. It integrates smoothly with content management systems, email clients and social media platforms, so you can ensure all of your written communication is flawless.
Key Features:
Real-time grammar and spell-checking
Style suggestions for clarity and engagement
Plagiarism detection for unique content
Use Case: Use Grammarly to polish your membership site’s blog posts, newsletters, and instructional content, maintaining professionalism and clarity throughout.
Fonts Ninja is a powerful Chrome extension designed for font enthusiasts and designers looking to streamline their typography choices. With Fonts Ninja, you can quickly identify any font used on a website, providing detailed information such as the font name, size, weight and color. Not only does it identify fonts, but it also allows you to test them out by applying them directly to your own content in real-time.
Key Features
Identify fonts on any website instantly
Access font details like size, weight, and family
Test fonts live on your own designs before purchasing or downloading
Use Case: Use Font Ninja to gather font inspiration from your favorite websites and test how they would look on your membership platform before making final decisions.
Color is a critical aspect of design, and ColorZilla is an excellent extension for designers who want precise control over color choices. This tool allows you to pick colors from any webpage and easily copy the hex or RGB code. It also includes a gradient generator and advanced color history features.
Use the eyedropper to get the color value of any area on a web page. Copy and paste the hex color code into other programs for the perfect match. Your picked color history is saved for future reference.
Key Features:
Eyedropper tool for color picking from any website
Easy copy-paste for color codes
Gradient generator and palette analyzer
Use Case: Use ColorZilla to pick color schemes from inspiration sites, or create consistent branding for your membership site with precise color matching.
5. Check responsiveness with Window Resizer
Window Resizer is a handy Chrome extension that lets you test the responsiveness of your website across various screen sizes. With just a click, you can resize your browser window to emulate different devices, such as smartphones, tablets, and desktops.
This extension helps you ensure that your membership site looks great on all devices. Window Resizer makes it easy to visualize and test changes in real-time.
Key Features:
Quickly resize your browser window to different screen sizes
Customizable dimensions and preset device sizes
Ideal for testing website responsiveness
Use Case: Use Window Resizer to verify that your membership site is user-friendly and visually appealing across various devices, ensuring a seamless experience for all your members, regardless of how they access your content.
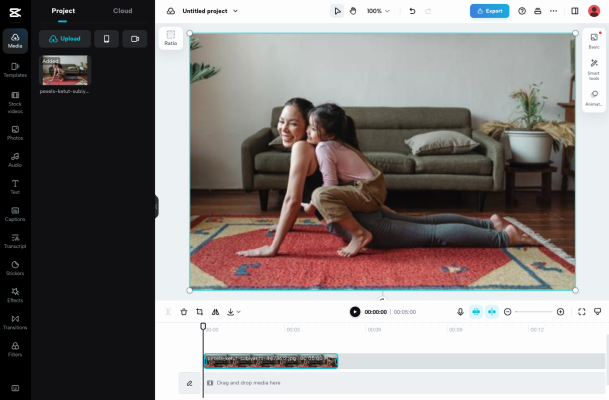
Screencastify is a user-friendly Chrome extension that allows you to easily record your screen, making it perfect for creating video tutorials, product demos or presentations. With just a few clicks, you can capture your entire screen, a specific browser tab, or even use your webcam for personalized video content. Screencastify also includes simple editing tools like trimming, merging clips, and adding annotations, helping you create professional-quality videos quickly.
Whether you're onboarding new members or showcasing how to use specific features, Screencastify is an excellent tool for any membership site.
Key Features:
Record screen, browser tab, or webcam
Built-in video editor with trimming and annotations
Export videos in multiple formats or upload directly to YouTube or Google Drive
Use Case: Use Screencastify to create step-by-step tutorials for your members, helping them navigate your website or learn how to use advanced features of your service.
Conclusion
Building a membership website involves a combination of content creation and design, and these six browser extensions can make the process smoother and more efficient. From identifying fonts to recording your screen, each tool offers something valuable to enhance the user experience on your site.
Give them a try, and see how they can help take your membership site to the next level!
Productivity hacks for membership website administrators
Managing your membership website, as you may know by now, is not something you dip into once in a while, but is a regular practice, and can be time-consuming. That's why it's important for membership site managers to take advantage of productivity tools and automations that can save time and money.
The most popular (and successful) strategies to attract new clients and keep them coming back are entered around producing content, for your website and social media engagement. the frequent addition of new content is so important for improving your search ranking, driving traffic to your website and for keeping subscribed members engaged and active.
But the task of regularly updating a membership website with fresh and relevant content can seem overwhelming at times, especially if: a) you’re doing everything yourself, and b) if you don’t have processes in place to make it all go as smoothly and quickly as possible.
To streamline workflows and maximize efficiency, here are 7 productivity hacks for membership website administrators that should help you boost your productivity so you can get more content out there in less time…and generate more paying, loyal clients for your business.
1. Task batching for productivity
Content creation is the lifeblood of your online membership business. You need content on an ongoing basis for your membership website, for your blogs, social media and newsletters. A good way to make these tasks easier to organize is to implement batching. For example, spend the day next Saturday creating 3 months of Facebook posts, then schedule them. You can create multiple pieces of membership content that way too - SubHub’s membership platform lets you schedule your content publication. Or you could rent a video studio for one day and polish off 12 videos for advertising or website content.
Another form of batching is to separate all the tasks involved in creating content - research, writing, editing, for example. Then do all the research for a dozen posts, then all the writing, then all the editing and posting. This allows you to stay completely focused and in one specific ‘brain mode’, creating flow. It requires a bit of planning ahead, but this kind of productivity means you have more time to focus on the money-making activities in your business.
2. Outsource or delegate non-core tasks
How can we increase productivity with outsourcing? Many entrepreneurs struggle with this one - when to outsource and when not? What to outsource and what not to?
If you can outsource the right tasks at the right time, obviously it’s going to save you time. Sources like Upwork.com and Fiverr.com are good places to find reasonably priced expertise on just about anything an online business owner might need, from graphics to software development.
Many small business owners outsourcesome of the more technical aspects of running their business, such as video editing, and creating Facebook or YouTube ads. You will still be at the helm of the content creation, but the strictly technical aspects of video editing, using the Facebook ad manager, and optimizing YouTube posts don't really need to have your personal input.
If you don’t have experience with these tasks, even if you want to do them yourself, they can easily end up being too time-consuming as you climb the learning curve. Outsourcing can be the answer. You might be amazed at how quickly and efficiently an expert can create something that would take you hours or weeks or even months.
3. Repurposing content to save time
When it comes to content, in a perfect world, we would all be able to come up with original, scintillating prose, graphics and video content on a daily or weekly basis. But the reality is, creating a video on Topic A, then creating a blog post on the same topic, and then a Facebook post, etc. etc., takes a lot of energy and creativity. The answer is repurposing content to increase productivity.
Let’s say you’ve created a video. The transcript of it could be used to optimize your YouTube channel. Then take the transcript and edit it to offer a synopsis for your Facebook post. Your blog post can contain a couple of lines of introduction with a link to the video.
For your newsletter, you can pull out one or two points from the transcript that would appeal to your list, and then point to the blog post. Once you get the process down, creating and posting content can be fast and easy. It could even be outsourced.
4. Content management tools
Have you ever attached a large file or files to an email, only to have it bounce back? At that point, you have to figure out how to make the files smaller, and if they are images, that can be tough without compromising their quality. Your best bet is to use a simple tool like DropBox or Google Drive to drop files into. Both of these tools let you easily share the link to the material.
Many third-party tools can be easily embedded into your membership website, no matter what platform it’s on. These tools can be used to efficiently mange certain tasks, directly from your website. Tools like Vimeo and Wistia allow videos to be embedded directly on your membership site, so you don’t have to upload and optimize each video. You can also embed features like photo galleries, calendars, audio files, forms and quizzes into your site, so you can easily promote use of your website to members, without having to share external links.
5. Project management tools
Project management tools can help administrators stay organized and keep track of tasks, deadlines, and team collaboration. Platforms like Asana, Trello, or Monday.com allow administrators to create and assign tasks, set priorities, track progress, and communicate with team members in real-time.
Another very handy type of project management tool is a a content calendar and editorial scheduling tool. This provides a roadmap for content creation and publication, helping administrators stay organized and consistent with their content strategy. Use a spreadsheet, Google Calendar, or specialized content management tools to plan and schedule blog posts, videos, webinars, and other content types in advance. Include details such as topic, format, publication date, and responsible team member to ensure accountability and timely delivery of content. Popular tools for scheduling social media posts are Buffer or Hootsuite.
Having trouble keeping your appointments straight? There are plenty of appointment setting tools out there to help, which will not only set the appointment, but send out reminder emails, texts, cancellation notices, and will even integrate with your favorite online call tool such as Zoom, Teams, or Streamyard.
6. Automate routine tasks
Adding automation to your business can save administrators valuable time and effort. Utilize tools and platforms to automate processes such as member registration, email marketing, content scheduling, and payment reminders. For example, set up automated email sequences to welcome new members, send out newsletters, or re-engage inactive subscribers.
SubHub’s platform allows an integration with MailChimp so you can market separately to different member groups. But if you are collecting email addresses and adding them to a list, be sure to set up an automation to welcome the new member and provide some valuable information going forward. Many of the tasks you will need to be automated are included in the SubHub platform as well, such as payment processing, recurring subscription renewals, cancellations and more.
A word of caution, though: You don’t want to get too complex with your automations before you’re ready. Spending hundreds of dollars per month on software you don’t need yet is only going to be a waste of money. Start with simple automations that are available in all-in-one platforms like SubHub, and grow into more complicated automations.
7. Templates for content & communication
Ever heard the saying “Don’t reinvent the wheel?” It’s good advice. There are thousands of templates available on the web: Email templates, sales letter templates, social media post templates, infographic templates, proposal templates, invoice templates and much more. Standardized templates for various types of content and communication can help immensely to streamline the creation process.
This could include templates for blog posts, email newsletters, social media posts, member welcome messages, and event announcements. You can create a template for a podcast or video, too. Not only do templates save time by providing a framework to work from, but they also ensure consistency in branding and messaging across different channels.
As you can see, creating a thriving membership-driven business has a lot of components to it, but there are also plenty of ways to make the job faster, easier, more profitable, and more fun.
If you’d like to get started on your profit-making membership website, start with free SubHub platform trial here: https://subhub.com/trial
What is task batching?
Batching is when you set aside a chunk of time and use it to work on just one project – no checking email, no meetings, no distractions. It’s the ultimate in single tasking. You can batch almost anything: blog posts, social media updates, graphics, sales emails, videos. But this only works if you tackle these things one at a time.
What is a team collaboration tool?
A tool that lets you create folders or channels for each client or topic lets all the chatter display in one place where you can easily keep up with the conversation.
What is repurposing?
Repurposing is using one piece of content in several ways to save time and effort. Let’s say you’ve created a video. The transcript of it could be used to optimize your YouTube channel. Then take the transcript and edit it to offer a synopsis for your Facebook post. Your blog post can contain a couple of lines of introduction with a link to the video.
When should I outsource?
Many small business owners outsource some of the more technical aspects of running their business, such as video editing, and creating Facebook or YouTube ads. If you don’t have experience with these tasks, even if you want to do them yourself, they can easily end up being too time-consuming as you climb the learning curve. Outsourcing can be the answer. You might be amazed at how quickly and efficiently an expert can create something that would take you hours or weeks or even months.
Incorporating video content into your membership website can significantly enhance the overall user experience and engagement of your community.
Whether you're delivering instructional content, hosting webinars, or showcasing exclusive interviews, videos can effectively communicate complex concepts and create a more immersive and exclusive environment for your members.
To help you create polished and professional videos, we list ten of the best video editing platforms for beginners and beyond.
1. VEED
Best for beginners.
VEED.IO stands out for innovative and user-friendly online video editing platform. Boasting an intuitive interface, Veed.io allows users to edit videos directly from their web browsers. The platform offers an impressive array of features, including text overlay, filters, transitions, and the ability to add music or subtitles. What sets Veed.io apart is its seamless integration of practical functionalities such as automatic transcription and the capability to create engaging animations. Basic editing tools are including in FREE planwith upload limit 1GB.
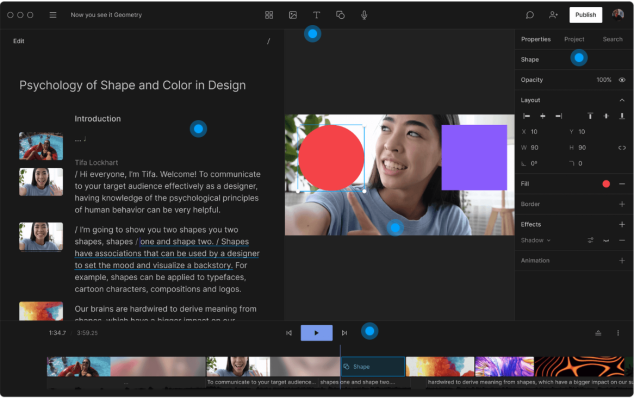
2. Canva's video editor
Best for simple edits.
Canva's free online video editor is a game-changer for anyone seeking a user-friendly yet powerful tool to create compelling video content effortlessly. With an extensive library of customizable templates, users can choose from a diverse range of themes, styles, and layouts to suit their specific needs. The editing tools include the ability to trim, cut and arrange clips, add text overlays, incorporate music or sound effects and apply various filters to enhance visual appeal. Canva also provides an extensive collection of tutorials to help you feel comfortable with the product. Basic editing tools are including in FREE plan.
3. CapCut
Best for social media video creation.
CapCut is a free versatile video editing platform that has gained popularity for its user-friendly interface and robust set of features. Developed by the same company behind TikTok, CapCut caters to a diverse user base, from beginners to more experienced video editors. The platform offers a range of editing tools, allowing users to trim, cut and arrange clips, add transitions, text overlays and music, as well as apply various filters and effects to enhance the visual appeal of their videos. CapCut's seamless integration with popular social media platforms facilitates easy sharing of the created content.
4. Vimeo
Best for analytics.
Vimeo is a leading video hosting platform and it offers a powerful video editor as part of its suite of creative tools. With a focus on simplicity and functionality, it allows users to trim, cut, and merge clips, add transitions, incorporate text overlays, and enhance their videos with a variety of filters and effects. Vimeo's video editor also enables direct integration with the platform's robust analytics so users can track the performance of their videos. Vimeo's FREE plan includes three videos.
5. DaVinci Resolve
Best for advanced creators.
DaVinci Resolve 18 stands out as a professional-grade video editing software that has become a go-to solution for filmmakers, editors and content creators seeking advanced tools and features. It offers a comprehensive and integrated editing, color correction, visual effects, and audio post-production suite, making it an all-encompassing solution for video production. The software provides a robust timeline editor with a wide array of editing tools, including cut, trim, transition effects, and more. It's free version comes with an extensive set of tools.
6. Filmora
Best for advanced creators.
Filmora is a user-friendly yet powerful video editing software that caters from beginners to more experienced content creators. Known for its intuitive interface, Filmora provides a range of creative tools that make video editing accessible and enjoyable. With a drag-and-drop editing system, users can effortlessly cut, trim, and arrange clips, add transitions, overlays and a variety of filters to enhance their videos. Filmora also boasts a rich library of pre-built elements like music, text and transitions, enabling users to easily elevate the production value of their content.
7. Shotcut
Best for advanced creators.
Shotcut is an open-source and cross-platform video editing software that has garnered a positive reputation for its versatility and accessibility. Designed for filmmakers, content creators and video enthusiasts, Shotcut provides a comprehensive range of features within a user-friendly interface. With support for a variety of video formats and resolutions, users can engage in tasks such as cutting, trimming, and merging clips, as well as adding filters, transitions, and text overlays to enhance their videos creatively. Shotcut's timeline editing system is intuitive, offering a seamless editing experience.
8. iMovie
Free for Mac users only.
iMovie is a versatile and user-friendly video editing software for Apple users only. The software offers a large selection of creative tools and features including trimming, audio editing and ready-made transitions. iMovie's library of built-in themes and templates offers a range of customizable options to enhance visual appeal. With its user-friendly drag-and-drop functionality, iMovie empowers both beginners and seasoned editors to create polished and engaging videos, making the art of filmmaking accessible to all.
9. Descript
Best for transcription.
Descript redefines audio and video editing with its innovative and user-centric approach. Its sleek and modern design reflects the software's commitment to simplicity and functionality. It's groundbreaking features include text-based editing capabilities, allowing users to edit audio and video by simply manipulating the transcribed text. The intuitive interface lets creators effortlessly cut, copy and paste spoken words as if they were editing a document. Descript offers a very limited FREE plan.
10. Motionbox
Best for beginners.
MotionBox seamlessly blends powerful features with user-friendly functionality. The software boasts a robust set of editing tools, allowing users to trim, cut and merge clips. Its timeline editor provides precise control over the pacing of your video, while the drag-and-drop functionality simplifies the entire editing process. MotionBox goes beyond basic editing with advanced features like color correction, audio enhancement and a variety of stylish transitions and effects to elevate the visual appeal of your content. Motionbox delivers ease and sophistication to both seasoned and novice content creators.
In conclusion
Including video content, as part of your membership content, fosters a sense of connection between you and your members.
By embracing video, you not only elevate the quality of your content but also cultivate a more vibrant and engaging online community.
It's time to build your membership website
Book a demo and see everything that's possible with SubHub.
Setting up your membership business model and a website that showcases your content and takes payments is a great first step in getting your membership community up and running.
Once you have members who have signed up for your content, you should also consider the idea of fostering group communication within your membership.
Even if you have a membership model that is predicated on certain groups that you specifically don’t want to be engaging with each other (for example, students vs. instructors or members vs. facilitators), it’s still a great idea to promote each community on its own.
There are many popular tools out there for communication - that’s what the internet is all about, right? So we’ve narrowed it down to the top 5 apps for community engagement that are often used by membership managers.
1. Facebook Group
This form of engagement is extremely popular, and you will find most course creators and membership website administrators have some sort of Facebook group available for their members to access for free.
Advantages
The advantage to this is that everyone (literally) has a Facebook account, and can easily click a link to add themselves to the group. Admins can also decide whether to allow the access or not, and can ask questions as a sort of pre-screening mechanism. Presumably, if a member has paid to be in your community, you don’t want to throw up barriers to allowing them into the Facebook group, so most admins allow the member to join immediately on clicking the link.
Admins also have some neat features at their disposal with Facebook groups, including the ability to run polls, create live videos, and of course, engage in real time. The other advantage is that setting up a Facebook group is free.
Disadvantages
As you have probably heard before, your data is not your own on Facebook, and that can potentially be a major problem. If for some reason, your group is taken down, you will have lost all the conversations and member information. You cannot download all the data from your group into a database, either. Another disadvantage is that your members have to go back and forth between your website and the Facebook page to truly be an engaged participant. Sharing comments is a wonderful way to keep members talking to each other, but remember, your overall goal is to keep members on your website, not going off to Facebook, where there are always a multitude of other distractions available.
2. WhatsApp
Let’s face it, everyone is turning to their mobile phone for communication by text these days. What’s App can be an effective way to give your members a community forum that is easy to access and can be configured for desktop access if desired. Initially released in 2010 as a text messaging app, WhatsApp was acquired by Facebook in 2014. Today, the app has more than 1 billion users, making it the most popular messaging app in the world.
Advantages
Set-up is fairly simple, just download the app and start inviting people to your group. You can sub-divide your group into topics or by member group. An additional advantage is What’s App’s end-to-end encryption, which means private conversations are guaranteed to be just that. Your messages are not available to be intercepted by anyone, not even What’s App.
Disadvantages
Again, this app, while handy, takes your members away from your website, and requires a bit of back and forth for members. And with all the notifications about various updates that everyone sees on their phone these days, notifications for your group can be lost or not acted on right away, leaving members to remember to check their What’s App for messages.
3. Slack
Most often used for teams and co-worker communication, Slack can also be used as a member group communication system. Once it is set up, you can create different workspaces, and different channels within each workspace. Let’s say you have a membership business for fitness and nutrition clients, and another one related to your passion for golf. You would create a workspace for each business, and then the appropriate channels within each.
Advantages
Channels are very versatile in Slack. Admin has control over how many are created, whether they are private or for all participants, and who you want to be invited to each group. Channels can be arranged by topic, category, member group, or all of those and more. The idea is to allow a controlled space for you and members to engage.
Again, this can take a bit of setup to get going, but once you have it running, it’s an easy platform to use. Members can be advised by notification when a new comment is made, and the name of the channel is bolded when there are messages to pick up.
Disadvantages
One downside of Slack is that when replying to a comment, the channel name does not turn to bold text. Members still get the notification, but it might not be immediately apparent where they should go to pick up the message. If you have a large group, it could become confusing when comments are constantly being replied to.
Unlike Facebook, not everyone has a Slack account, and isn't the most straight forward to create. Most people think of Slack as a business app rather than a community forum, so members may be a little reluctant to jump in.
4. Discourse
Discourse has been around for many years and has always been a popular community communication option. You can use it as a mobile app or an online forum on desktop.
Advantages
A unique advantage to Discourse is that it’s “open source”. What that means is that you own the data. Unlike Facebook and Slack, your conversations are your own property and can never be lost. In fact, you can download your data to a database if you wish.
Discussions can be public or private, and you can create topics and subtopics to help users find the conversations they are interested in. Discourse also offers a 14-day free trial.
Disadvantages
The Basic service is limited to private discussions only, and all participants must be invited. If you want to be able to offer public discussions and allow members to join freely, the Standard tier is $100/month.
5. On-Site Forum
A distinct disadvantage of all the above-mentioned off-site options is that none of them can be embedded into a website. Which means your best option may be to take advantage of built-in forums within the membership platform you are using.
Advantages of an on-site forum for member communication
If you're using WordPress, there are a number of plugins that are available. If using a dedicated membership platform, some offer a built-in forum and some don’t.
The SubHub platform’s member forum offers the ability to create unlimited forums, topics, and discussions. Members can be notified by email when there are replies to comments. Avatars are picked up from member profiles, which all members have access to. By default, the forum is member-only access. The public view shows just enough to encourage those interested in the topics to join as a member. In addition, forums can be restricted by member group.
Disadvantages of an on-site forum
Built-in forums often don’t allow members to upload images and videos, but can provide links. An image link can be created by uploading an image via a media manager, and linking to the resulting URL. Videos hosted on YouTube, Vimeo.com or another third-party hosting service can be easily linked. Many membership managers actually prefer to not have the distractions of images and videos in member discussions, as it can leads discussions off into unrelated tangents. Most admins prefer to keep the discussion to the material they are providing.
Final Note
By far the number one reason to use a built-in forum right on your membership website is the ease of use for your members. They can simply click on the link to reach the forum anytime they are on your site. This of course, keeps your members engaged where you want them to be - on your website.
Haven't started your membership website yet? Get started with a free 14-day trial:
Non-profit organizations play a crucial role in society, offering support to those in need. However, small non-profits often struggle with accepting donations due to limited access to banking services like PayPal. Fortunately, there are several alternative payment processing options available. Here’s a detailed guide on the pros and cons of PayPal and tips for finding an alternative solution.
Step 1. Identify your organization's payment processing needs
The right payment processor depends on the types of payments you plan to accept. Many non-profits rely on donations and need a simple way for website visitors to contribute. You might also sell items such as e-books, digital products, or physical goods, either at cost or with proceeds supporting your cause. In these scenarios, you need an online payment processing system unless you're handling payments offline.
For product sales, you can use almost any online processing system, including PayPal, Stripe, Square, and Shopify. Research each option for costs and ease of use for both you and your customers.
For donations, you could offer set amounts (e.g., $20, $100, $200) without allowing visitors to choose their own donation amount. PayPal and others are suitable for this. Alternatively, you may want to allow any donation amount with a minimum required donation. Now is the time to start researching the best options for your online donation needs.
Step 2. Research payment processing alternatives
Paypal
Pros:
Viable for any donation scenario, offers a reduced transaction fee for registered 501(c) charities (2.2% + $0.30 vs. 2.9% + $0.30). PayPal is widely recognized and trusted, making donors more likely to feel secure using it. It's easy to integrate with most websites, and many platforms already support PayPal. If the platform you are using is not integrated with it, you can still set up PayPal Donation buttons on your site. The user experience can be somewhat jarring, though, as the donor is taken off your website and is prompted to sign into PayPal immediately upon clicking the “donate” link.
Cons: Donors are redirected away from your site and must log into PayPal, which can disrupt the user experience. This could potentially result in a loss of donations if the donor gets distracted or decides not to continue with the process.
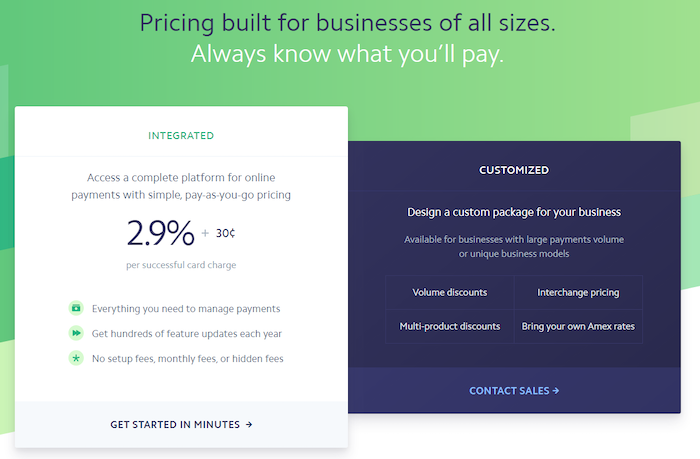
Stripe
Pros:
Stripe offers a streamlined user experience with popups or well-designed forms, discounted transaction fee for non-profits (requires nonprofit status and 80% donation processing on Stripe). Stripe's seamless integration keeps donors on your site, reducing the chances of drop-offs. It supports multiple currencies and payment methods, offering flexibility for international donations.
Cons: You'll need integration with a platform like DonorBox for full functionality. Stripe can be more complex to set up compared to PayPal, requiring more technical knowledge and support.
Donorbox
Stripe has an additional benefit due to its integration with a product called DonorBox. This platform allows you to customize the donation process to suit your organization's needs, offering features like donation tiers, goal meters, and donor wall displays. DonorBox also provides flexibility in presenting donation options, minimum donation amounts, recurring donations, donation tracking, and reports.
If your website is a SubHub membership website, you can use Stripe or Paypal or both as the platform is integrated with both processors.
Cons:
There is added complexity if used without Stripe. While DonorBox is free to start, it charges a 1.5% platform fee on top of Stripe's fees for the donations processed.
Eventbrite
Pros:
Another type of payment structure is to couple donations with an event. Eventbrite is an event platform that lets you sell tickets at a set price, but also provides a way to donate a voluntary amount in lieu of admission sales. Eventbrite might be a good solution for raising funds through a virtual event.
If you are running events on a regular basis, Eventbrite may be a good choice for you as it also offers advanced features such as late registrations, waitlist management, a customizable order form, confirmation webpage and email, automatic adding of your event to Facebook if desired, and auto emails to attendees. With these features, you can set up reminder emails to go out to attendees at pre-determined time intervals. If you prefer to use a template for your email design, Eventbrite also integrates with Mailchimp. This also means you can capture the contact information of registrants within Mailchimp and set up an autoresponder series to send out after the event.
Cons:
While they don’t offer a reduced transaction fee rate, you do have the option of passing the fee on to the donor, which in a charitable scenario, your donors may not object to. Eventbrite's fees can add up, especially for larger events or higher-priced tickets.
These platforms are good for specific financial goals or project-based fundraising. Fees are only charged on successfully collected donations. Crowdfunding platforms often come with built-in marketing tools and community support, helping you reach a wider audience and increase your fundraising potential.
Cons:
Kickstarter charges a fee on the entire amount you collect in addition to transaction fees, so it’s not the least expensive choice. But because it’s based on pledges, you will only pay fees on donations that are successfully collected. In addition, if your campaign is unsuccessful, meaning your target was not met and all donations were returned to the donors, you won’t pay any fees.
Step 3. Choose and implement your payment processor
After identifying the best model for your fundraising (event tickets, fundraising campaigns, product sales, or donations), it’s time to implement your choice. For platforms like SubHub, Stripe with DonorBox or PayPal are easy to integrate. SubHub also supports membership and course functionality, which can enhance your donation strategy by offering free courses or memberships with a donation or selling event tickets.
When choosing and implementing your payment processor, look for:
Ease of Integration: Ensure that the payment processor integrates seamlessly with your existing website or platform. Check for available plugins or APIs.
User Experience: Test the donation process to ensure it is smooth and user-friendly. The fewer steps a donor has to take, the better.
Security: Ensure that the payment processor complies with security standards (e.g., PCI DSS) and offers fraud protection.
Cost: Consider the transaction fees and any additional costs associated with the payment processor. Factor in any discounts available for non-profits.
Support: Check the level of customer support provided. Reliable support can be crucial if you encounter technical issues or have questions about the service.
While PayPal remains a popular choice, exploring other online payment options can benefit non-profits to keep the funds coming in. For those using SubHub, sign up for a free trial to explore how Stripe with DonorBox or PayPal can streamline your donation process.
Running a membership website requires dedication, creativity and efficient time management to ensure it reaches its full potential. Whether you're a seasoned webmaster or just starting out, enhancing your website's productivity is crucial for attracting and retaining visitors. Here are five valuable tips to help you become more productive in managing your membership website:
1. Set clear goals and prioritise tasks
Productivity begins with a clear understanding of your membership website's purpose and goals. Define your target audience, the type of content you want to provide and what you want to achieve. Once you have a clear vision, break down your goals into actionable tasks and prioritise them based on their importance and deadlines. Use tools like to-do lists, project management software or even simple spreadsheets to keep track of tasks and stay organised.
2. Streamline content creation and management
Content is the backbone of your membership website. To be more productive, establish an efficient content creation and management process. Develop an editorial calendar to plan content ahead of time, ensuring a consistent flow of blog posts, videos, course creation and social media promotion.
Learn how to use tools like ChatGPT to increase your content output and generate ideas. Key to keeping members engaged and their long-term retention, is the regular posting of new content.
3. Optimise website performance
A slow-loading website can deter visitors and harm your search engine rankings. Take steps to optimize your website's performance by compressing images, leveraging browser caching, and using content delivery networks (CDNs). Regularly monitor your website's loading speed using tools like Google PageSpeed Insights or GTmetrix, and make necessary adjustments to enhance user experience.
4. Embrace automation and tools
Automating repetitive tasks can free up valuable time for more strategic activities. Explore automation tools for social media scheduling, email marketing, and analytics tracking. For instance, tools like Hootsuite can help you schedule social media posts in advance, while Google Analytics can provide insights into user behavior on your website. Integrating these tools can help you make informed decisions and allocate resources effectively.
5. Regularly update and maintain
Maintaining your website's functionality and security is essential for long-term success. If you're not tech savvy, then using an all-in-one membership website platform like SubHub will be the best solution for you. All-in-one platform automatically handle software and security maintenance and updates.
Conclusion
In conclusion, increasing your website's productivity involves a combination of strategic planning, efficient processes, and continuous improvement. By setting clear goals, optimizing content creation, streamlining performance, embracing automation, and maintaining your website's health, you can not only enhance productivity but also provide a better experience for your visitors. Remember that consistent effort and adaptation are key to achieving sustainable growth and member retention.
Free membership ebook
Download our five-step guide to a profitable membership website
Chances are good you’ve been hearing a lot about AI tools lately. You might be wondering which tools you can or should be taking advantage of in your membership business. It’s true that a number of these super-intelligent programs have recently exploded onto the market, so what better time than now to go exploring? Here are 5 use cases and examples of artificial intelligence resources that membership website owners can use to automate tasks, create content, communicate with members and research membership business ideas.
Communication
AI Tool Example: Chat Bots
Chat bots can be used in many different ways by membership managers. They can work hand in hand with email marketing programs to let you make even more efficient decisions about list segmentation. Chat bots can be very helpful to first-time visitors to your website by offering an array of knowledge base information, or directing them to an FAQ section on your website. They can answer common queries, guide new members through the platform, and provide access to a live support representative (you or someone you designate).
If you don’t have the bandwidth to be available for live chatting, you can also have the bot default to an email capture of name and email address. The visitor at least gets to “leave a message”, and you have a lead that you didn’t have to even be on your website to get. Some examples of chat bots are chatbot.com, drift.com, liveperson.com, intercom.com. Chatbot embed code can be easily added to your SubHub site to offer support at any stage of your client's customer journey, from first-time visitor to loyal member.
Content Creation
AI Tool Example: ChatGPT
If you haven’t heard (which is unlikely at this point!), ChatGPT is am extremely versatile AI tool that can generate copy, write poetry, headlines, and answer just about any question you may have on any topic. For membership website managers, an intriguing application is the ability to write computer programs. Now don’t worry, you don’t have to know anything about code to use it. Let’s say you’re a nutritionist, and you want to offer your members a tool that would allow them to generate meal plans in less than a second, based on your ingredient recommendations. As an experiment, I entered the following command into Chat GPT:
Write a script that allows a user to input a number of calories, then build 3 meals including ingredients from these food groups: dairy, eggs, meat, grains, vegetables, and fruit, each meal containing the number of calories input.
It’s a fairly vague instruction and not all that practical. Each meal is to contain an ingredient from each of the food groups mentioned. The beauty is you can replace those groups with something else, add your own elements of each group, ask it to include recipes for individual suggestions, and anything else you could think of.
From the time I entered the query to the time I tested the script on a webpage was about 5 minutes. This is a simple example, but the main point is that you can easily have ChatGPT whip up a quick quiz or generator like this one to either intrigue your first-time visitors, or act as a premium content for your current membership. See the meal generator in action here: https://youngvoafip.subhub.net/pages/meal-generator
If you don’t already have a ChatGPT account, you can go to chat.openai.com and set up a free account.
Keyword Research
AI Tool Example: Answer the Public & Ubersuggest.com
These are products created by NP Digital, a huge digital marketing company headed up by Neil Patel.
You can get a free version of Ubersuggest.com for your own website. Ubersuggest is a perfect tool to start with if you are just at the beginning of your membership business journey, and trying to discover if your idea is even viable.
You can plug in any number of keywords related to your general topic, and you’ll be returned a list of monthly volumes for that keyword. In other words, you can answer the question, “Is anyone searching for this?” You might find that thousands of searches per month are recorded in search engines for your topic. On the other hand you might find out there are zero searches for your niche topic. It’s a great place to start to week out niche ideas that have little appeal, and to seriously consider those with higher volumes.
Of course, there is more to picking out a niche topic and building an entire membership business around it than a few keywords. But it is a good place to start. Let’s say you wanted to create a coaching website for swimming instructors. Is that a viable niche? Ubersuggest (and similar tools like Semrush.com) can give you search volumes per month for the keyword “swimming instructor coaching”.
Ubersuggest’s companion software "Answer the Public" offers a similar service. But in addition to search volumes for a keyword or topic, it returns actual questions that searchers ask (and that you will often find in the “People also ask” section in Google searches.) Answering these questions are a great starting point for blog post topics, courses and lesson topics, Q & A sessions, and newsletter topics.
Image Creation
AI Tool Example: Starryai.com
As a membership business manager, you are responsible to paying members to keep your material interesting and original. What better way to demonstrate originality than to have your text material accompanied by AI-created images? How many times have you seen the same image-bank photo showing up on different websites, blogs, and course material? You won’t have that problem if you use one of the many image-generating AI tools available. I tried Starry.io (suggested by ChatGPT), and found mixed results for the moment, but I’m sure the technology will improve with time.
Collaboration
AI Tool Example: GPT-4
Who knows how far the AI world will go…right now new tools are springing up all the time offering more and more advanced capabilities. One is GPT-4, the next generation of ChatGPT. It’s available with a paid subscription to ChatGPT, but apparently Bing Chat allows free access if you’re willing to use Microsoft Edge as your browser.
What are the advantages over regular ChatGPT? It purports to be able to “generate, edit, and iterate with users on creative and technical writing tasks, such as composing songs, writing screenplays, or learning a user’s writing style”. For the moment, it’s free via Bing Chat. You’ll need to be logged into a Microsoft account to take full advantage of the features.
Here is an example of its capabilities from the Openai.com website:
Like any tool, no matter how advanced or intuitive, it's up to you how or if it can be of service to you as a membership manager. You may not have a use for a program that explains the plot of Cinderella in a sentence that uses words beginning with consecutive letters of the alphabet...but can you think of other games, challenges or resources that one of these tools could help you create? Whether it's creating a meal plan, original art for an event invitation, or improving the effectiveness of your membership content, it's worth considering how AI might make your life easier, and managing your membership business more fun.
Get started on your membership site today with a free 14-day trial of the SubHub platform.
If you're planning to launch a membership website, you'll need to connect it to a secure and trustworthy payment processing gateway. Two of the most popular choices are Stripe and PayPal. Our clients often ask us which we would recommend Stripe vs PayPal?
Stripe and PayPal offer payment gateway solutions for accepting online payments. And many web platforms offer both as processing solutions.
Being a long-time player, PayPal has instant name recognition and a high trust factor with millions already having active PayPal accounts.
PayPal offers a number of gateway products but this article will focus on Payments Standard and Payments Pro.
By contrast, Stripe opened shop in 2009 but has quickly gained steam as a favorite of developers due to its ease of use and functionality.
They have many similarities but also some distinct differences.
Compare Transaction fees
Stripe charges 2.9% on each transaction + a fixed fee of $0.30 cents on every successfully processed payment originating in the US. Depending on your plan, PayPal fees range from 2.59%-3.49% + a fixed fee of $0.49 cents.
With transactions on non-US cards, the percentage of the processing fee increases. Stripe charges 3.9% and PayPal charges 4.4%.
When opting for PayPal Payments Pro, in addition to the transaction fees, there’s a $30 monthly account fee.
Chargebacks fees
Chargebacks occur when a customer reports to their bank a transaction they don’t agree with or think is fraudulent.
Each payment gateway has a dispute process that allows you to respond with evidence against a claim or to accept it.
If the dispute resolution is in your favor, the transaction amount is returned to your account. If it is not, you will incur a chargeback fee.
Stripe’s chargeback fee is $15.00 while PayPal’s is $20.00.
In addition, if the customer wins the dispute, Stripe will retain all processing fees while PayPal will only return the fixed fee.
Payout schedule
As an anti-fraud measure, Stripe holds payments for seven days before they are released and can be available for pay out to a linked bank account.
Payouts can be scheduled or initiated at your convenience.
PayPal allows instant withdrawal of funds directly to your account.
Neither Stripe or PayPal charges a fee to transfer money to your bank account.
Supported currencies
Stripe is available for business in 47 countries and supports 135+ currencies.
PayPal is available in over 200 countries and supports 25 currencies.
By supporting multiple currencies, this allows you to charge customers in their native currency while receiving funds in yours.
However, when there’s a difference in currencies, the customer may be charged a foreign exchange fee by their card issuer. They may also be charged a fee if their credit card and your business are in different countries.
Stripe allows you to test the payment processing before accepting real payments. This is done by setting your Stripe account to test mode and pasting the Secret Test Key into your website.
You can then make trial purchases with these test card numbers using any expiry date, name, CVC, and zip code.
PayPal does have a payment test function called PayPal sandbox but it’s more for the tech savvy.
Customer support
When it comes to Stripe vs PayPal on customer support, Stripe comes out on top.
Stripe’s 24/7 customer support is always available to respond to your queries through multiple channels which include live chat, phone and email.
PayPal has fixed support hours and its support channels only include phone and email. They do promote engaging with their community forum, however, receiving official support is always preferable, especially when dealing with money matters.
Security
Both gateways, are PCI compliant and take security seriously.
Customer’s financial details are processed within the systems of Stripe and PayPal.
Stripe’s entire payment process is securely protected. It forces HTTPS for all services using TLS (SSL). All card numbers are encrypted and stored in a separate hosting infrastructure.
The credit card data entered into your payment form is never sent to your server. Instead, the data is sent directly to Stripe.
With PayPal, a customer’s financial information is never shared, and they pay using only an email address and password.
Checkout experience
Stripe’s seamless checkout experience is simple and straightforward. A customer enters their card details and clicks submit. They never leave your site during the checkout process.
With PayPal Payments Standard, your customer is redirected to PayPal where your customer has to log in to complete payment. Added steps always increase the chance of cart abandonment.
The benefit of PayPal Pro is the ability to control the checkout experience. Instead of customers being redirected to PayPal’s gateway, you can design and host your checkout page for a seamless experience.
Comparison of admin experience
While many articles comparing Stripe vs PayPal, focus on fees, checkout and support, rarely do they ever evaluate one of the most important factors – the admin user experience.
When dealing with customer accounts, being able to easily reference payment details is essential. In both, interface and search functionality, Stripe outperforms PayPal.
Dashboard
Stripe’s dashboard and control panel are clean, modern and intuitive while PayPal’s is cluttered.
Search function
Stripe’s search function is light years ahead of PayPal’s. Whereas a simple search query with PayPal necessitates navigating through multiple filters and screens, Stripe’s search delivers results with a single click.
In conclusion
Both Stripe and PayPal have their own unique benefits, and the best choice depends on your specific needs and preferences. Stripe may be a better choice for businesses that require a high level of customization and flexibility, while PayPal may be a better choice for businesses that need a payment platform that is widely accepted and easy to use.
There is though a benefit to providing choice to customers. If you have a large customer base and the bandwidth to manage two gateways, I would recommend using both options and let your customers choose which payment method suits them best.
However, if you want ease of use, lower fees, combined with maximum functionality, Stripe is the way to go and the gateway we always recommend. In nearly all areas, except for name recognition, Stripe has the edge over PayPal.